By doing this, You can use the official Tailscale VPN infrastructure and clients without creating an account on tailscale.com
First, let’s assume some basic information
You have a web server running at:
example.com
Your Zitadal running at:
login.example.com
Your admin account on Zitadal:
[email protected]
Then, Create webfinger file point to your Zitadal server, this part may be slightly tricky.
1)Go to the root directory of your web server and create the following folders
[your_wwwroot]\.well-known\webfinger
2) Create “webfinger.jsonjrd” under “webfinger” folder
3) Edit “webfinger.jsonjrd”, assuming you want to add an account for yourself and an account for your friends.
{
  "subject": "acct:[email protected]",
  "links": [
    {
      "rel": "http://openid.net/specs/connect/1.0/issuer",
      "href": "https://login.example.com"
    }
  ],
  "subject": "acct:[email protected]",
  "links": [
    {
      "rel": "http://openid.net/specs/connect/1.0/issuer",
      "href": "https://login.example.com"
    }
  ]
}
(You have to put every account that will use VPN in this file)
4) Set the default document for this folder to “webfinger.jsonjrd”
5) IMPORTANT Set MIME for this folder.
Define .jsonjrd as application/jrd+json
If you don’t do this, Tailscale will reject your webfinger file.
(“application/json” won’t work)
You can easily find guides on Google for steps 4 and 5.
Here is my web.config file for IIS
<?xml version="1.0" encoding="UTF-8"?>
<configuration>
    <system.webServer>
        <defaultDocument enabled="true">
            <files>
                <remove value="index.html" />
                <remove value="index.php" />
                <add value="webfinger.jsonjrd" />
            </files>
        </defaultDocument>
        <staticContent>
            <mimeMap fileExtension=".jsonjrd" mimeType="application/jrd+json" />
        </staticContent>
    </system.webServer>
</configuration>
6) Verify your webfinger with Tailscale
https://login.tailscale.com/start/oidc
Use your Zitadal account for the test, in this post is [email protected]
- If you didn’t encounter any error after clicking “Get OIDC Issuer” and Tailscale is asking for a client ID, then you are good to go.
- If you got 404, then probably check steps 1, 2, 3, 4
- If you got 406, then is the MIME problem, check step 5
Last, create the Tailscale application in Zitadal. This is the easy part.
1) Login to your Zitadal server with admin account
2) Create a new project “TailScale”
3) Create a new app “TailScale”, with the following settings:
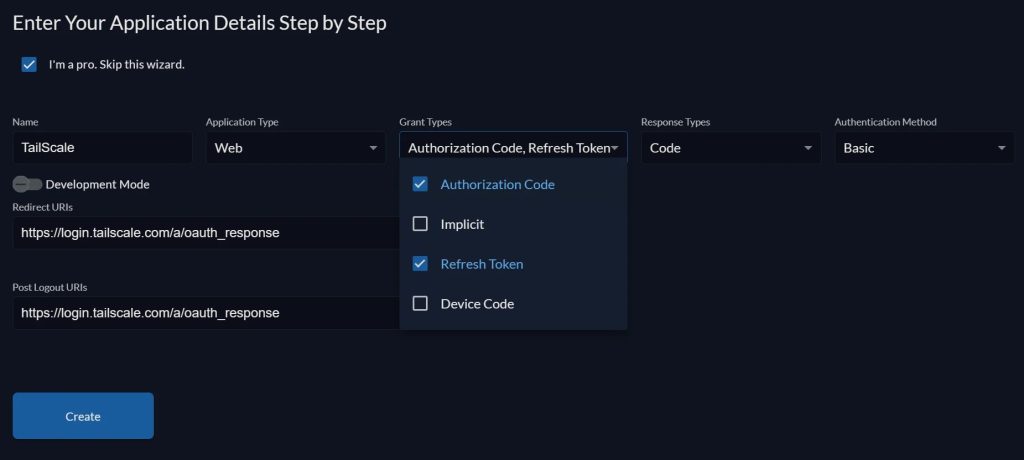
Redirect URL:
https://login.tailscale.com/a/oauth_responsecancel
4) Copy your clientID and secret and go back to Tailscale
https://login.tailscale.com/start/oidc
5) Put in the information accordingly, and check consent, login, select_account.
WARNING Before clicking “next”, make sure your zitadal running on the URL you desired, you will have to contact the Tailscale support team to change your IdP once set.
6) Tailscale should transfer you to your Zitadal server for login, after login, you will back to Tailscale and your network is already created. ready to set up your first device.
Congrats, now you are ready to go.
In the future, when you log in to Tailscale, just use your Zitadal account and Tailscale will automatically transfer you to your Zitadal server for login.